

with Self Rising Flour
Table of Contents
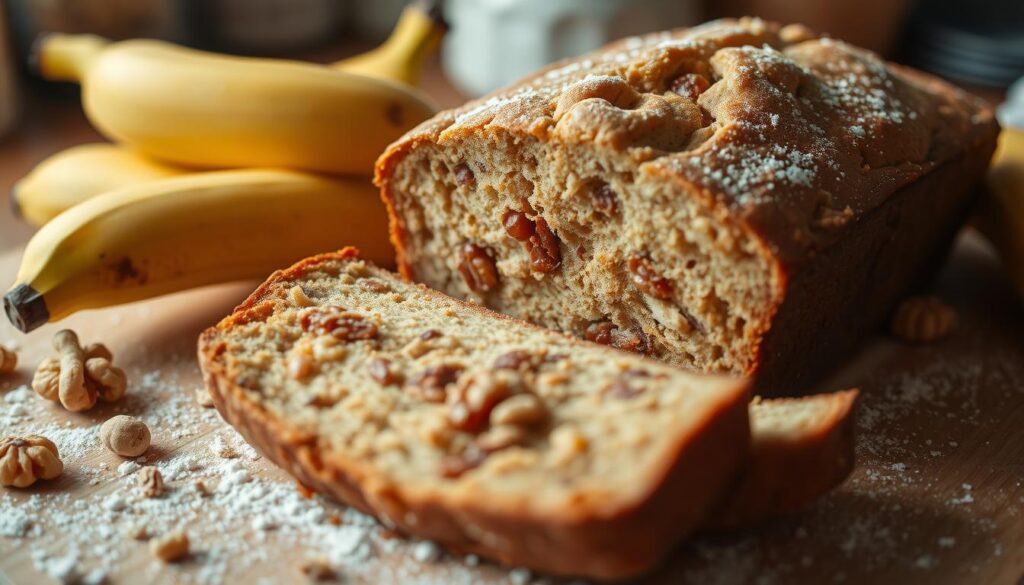
Baking moist and flavorful Easy Banana Nut Bread Recipe with Self Rising Flour is now easier than ever. Self rising flour makes it simple. This recipe lets you make a bakery-style banana bread at home. Just a few ingredients and some quick prep are needed.
You’ll love the aroma and soft texture of your homemade banana nut bread. It’s perfect for breakfast, snacks, or sharing with loved ones.
Key Takeaways
- Self rising flour simplifies the baking process for banana nut bread
- Achieve a moist and flavorful texture with minimal effort
- Perfect for both beginner and experienced bakers
- Enjoy the delicious combination of bananas and nuts in every slice
- Ideal for breakfast, snacks, or sharing with family and friends
Why Self Rising Flour Makes Perfect Banana Bread
Baking banana bread is easy with self rising flour. It combines all the leavening agents you need. This means you don’t need to add baking soda or baking powder separately. Your banana bread will turn out light and airy, sure to impress everyone.
Benefits of Using Self Rising Flour
Self rising flour makes banana bread easier to make. It saves you time by combining all the dry ingredients for you. Plus, it ensures your bread rises evenly, giving it a nice texture.
How Self Rising Flour Affects Texture
Self rising flour makes banana bread incredibly light and fluffy. The leavening agents in it help the bread rise beautifully. This results in a soft inside and a golden crust, perfect with the sweetness of bananas.
Using self rising flour is a great choice for banana bread. It’s convenient and makes your bread delicious. Try it in your next banana nut bread for amazing results.
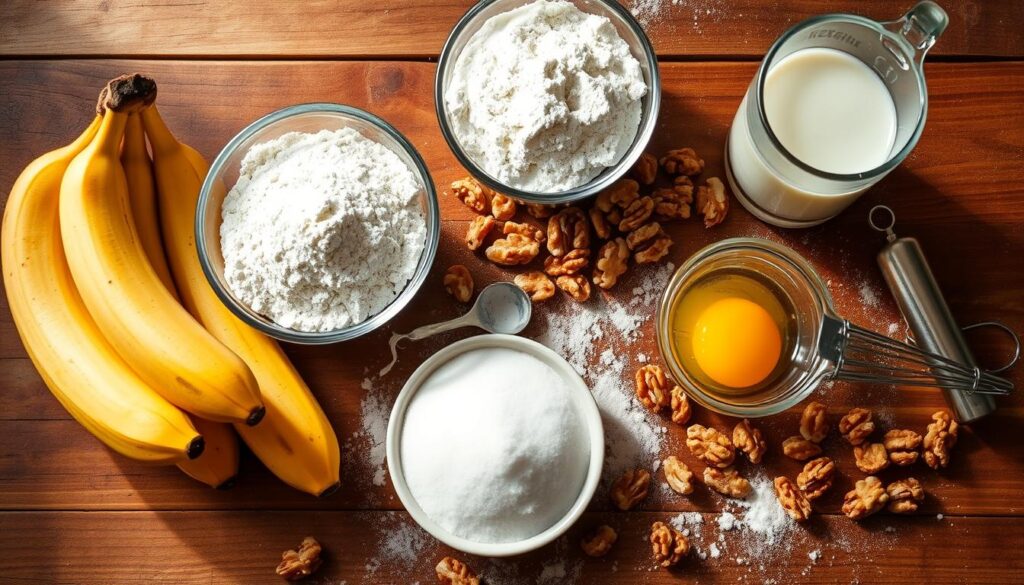
Essential Ingredients for Your Banana Nut Bread
To make a delicious banana nut bread with self rising flour, you need the right ingredients. Ripe bananas are the main attraction, while sugar, eggs, and nuts support them. Each ingredient is crucial for a perfect loaf. Let’s look at the key ingredients for a banana nut bread that’s a real treat.
Key Ingredients
- Self Rising Flour: This flour is a blend of all-purpose flour, baking powder, and salt. It’s perfect for a great rise and texture in your banana nut bread.
- Ripe Bananas: Choose bananas with brown spots for enhanced sweetness and flavor. Mashing them makes their sweetness spread evenly in the batter.
- Granulated Sugar: A bit of sugar boosts the bananas’ sweetness and pairs well with the nuts.
- Eggs: Eggs bind the bread, making it tender and moist.
- Chopped Nuts: Walnuts or pecans add a nice crunch and nutty taste to the bread.
With these ingredients, you’re ready to make a recipe for banana nut bread made with self rising flour. It’s sure to wow your family and friends.
Kitchen Tools and Equipment Needed
To make a tasty banana bread with self rising flour, you need some basic kitchen tools. From mixing bowls to baking pans, the right tools make baking fun and easy.
Mixing Tools and Bowls
You’ll start with a big mixing bowl for all the ingredients. A strong spoon or whisk helps mix the batter well. An electric mixer can also help, making the batter light and fluffy.
Baking Pan Requirements
For baking your banana nut bread, use a loaf pan. Choose a 9×5 inch or an 8×4 inch pan. These sizes help the bread bake evenly and look great. Make sure to grease the pan to avoid sticking.
Optional Equipment
- Parchment paper or baking spray for easy removal from the pan
- Cooling rack for allowing the bread to cool completely before slicing
- Toothpicks or a cake tester to check for doneness
- Serrated knife for slicing the banana bread
With the right tools, you’re ready to bake a delicious banana nut bread. Feel free to try new mixing and baking methods to make your recipe even better.
Banana Nut Bread Using Self Rising Flour
Making a tasty banana nut bread with self rising flour is easy and fun. This ingredient makes the recipe simpler and improves the bread’s texture and rise. Here’s how to make the best self raising flour banana bread.
- Preheat your oven to 350°F (175°C) and grease a 9×5-inch loaf pan.
- In a large mixing bowl, combine 2 cups of self rising flour, 1 teaspoon of baking soda, and a pinch of salt. Whisk the dry ingredients together until well combined.
- In a separate bowl, mash 3 ripe bananas until they reach a smooth consistency. Add 1/2 cup of granulated sugar, 1/3 cup of melted butter, 2 large eggs, and 1 teaspoon of vanilla extract. Mix these wet ingredients until they are thoroughly incorporated.
- Gently fold the wet banana mixture into the dry flour mixture, being careful not to overmix. If desired, fold in 1 cup of chopped walnuts or pecans.
- Pour the batter into the prepared loaf pan and smooth the top with a spatula.
- Bake the banana nut bread made with self-rising flour for 55 to 65 minutes, or until a toothpick inserted into the center comes out clean.
- Allow the banana bread made with self-rising flour to cool in the pan for 10 minutes before transferring it to a wire rack to cool completely.
Using self rising flour makes your banana nut bread moist and tender. It also gives it a great rise and a nice nutty crunch. You can add chocolate chips, cinnamon, or a cream cheese frosting to make it your own. Enjoy the warm, comforting aroma and delicious taste of this homemade treat.
Tips for Selecting and Ripening Bananas
Choosing the right bananas is crucial for a tasty banana bread. The ripeness of your bananas affects the bread’s flavor and texture. Let’s look at the best ripeness and how to ripen bananas quickly.
Ideal Ripeness Level
The best bananas for banana bread are slightly speckled with brown dots. This shows they’re ripe, with the right mix of sweetness and moisture. Avoid bananas that are too ripe or too yellow, as they can be too soft for baking.
Quick Ripening Methods
If your bananas aren’t ripe enough, there are ways to speed up the process:
- Put bananas in a paper bag and fold the top. The ethylene gas from the bananas will help them ripen faster.
- Place bananas in a warm spot, like on top of the fridge or in a sunny window. Warmth speeds up ripening.
- Add a ripe apple or tomato to the bag with the bananas. Their ethylene gas will also help ripen them.
By using these tips, you can get your bananas perfectly ripe for your banana bread. This ensures a moist and flavorful loaf every time.
Mixing and Preparation Techniques
Creating the perfect banana nut bread with self rising flour requires the right mixing and preparation. Let’s explore the best ways to make your batter just right.
Mashing the bananas is the first step. They should be well-mashed but still have some chunks. This keeps the banana flavor and texture in your bread. Don’t mash them too much, or your bread will be too dense.
Mixing in the self rising flour is easy. Just whisk it with the other dry ingredients until they’re mixed well. The self rising flour makes the bread light and fluffy, matching the moist banana perfectly.
- Gently fold in the chopped nuts of your choice. Be careful not to mix too much. This makes sure the nuts are spread out evenly in the bread.
- Check the batter’s consistency. It should be thick but still pourable. If it’s too thick, add a bit of milk or buttermilk to thin it out.
Using self rising flour changes how you prepare the bread. Since it already has baking powder and salt, you’ll need to adjust the amounts of other ingredients.
By following these tips, you’ll make a tasty can you use self rising flour for banana bread. Your family and friends will love it.
Baking Temperature and Timing Guide
To make the perfect banana nut bread with self rising flour, pay close attention to the baking process. The right temperature and knowing when it’s done are key. This ensures your banana nut bread is moist, flavorful, and perfectly baked every time.
Temperature Settings
First, preheat your oven to 350°F (175°C). This temperature is perfect for baking banana nut bread with self rising flour. It helps the bread rise and get a golden, crisp crust while keeping it soft inside.
If your baking pan is different from the recipe, you might need to adjust the oven temperature. For a bigger pan, lower the temperature by 10-15°F. This prevents the outside from getting too brown before the inside is fully baked. On the other hand, a smaller pan might need a slightly higher temperature, around 355-360°F, for even baking.
Visual Doneness Indicators
- The top of the banana nut bread should be a deep, golden brown color.
- Check the center with a toothpick or cake tester. It should come out clean, with no wet batter.
- The edges should be pulling away from the pan, showing it’s fully baked.
- Gently press the top of the loaf. It should spring back lightly, not feel dense or doughy.
By following these temperature guidelines and visual cues, you’ll make the perfect banana nut bread with self rising flour every time.
Storage Tips and Shelf Life
Keeping your banana nut bread fresh is key. Wrap it tightly in plastic wrap or foil for room temperature storage. This keeps it fresh for 3-4 days.
For longer freshness, refrigerate the bread. Wrap it well and store it in the fridge for 5-7 days. Let it come to room temperature before enjoying for the best taste.
Freezing is another great option for longer storage. Wrap it in plastic or foil, then in a freezer bag. Frozen, it stays good for 2-3 months. Thaw it at room temperature or gently reheat in the oven for a warm treat.
FAQ
Can you use self rising flour for banana bread?
Yes, you can use self rising flour for banana bread. It has baking powder and salt mixed in. This makes the baking process simpler and the bread turns out light and fluffy.
What is the benefit of using self rising flour for banana bread?
Using self rising flour is convenient. It has leavening agents already in it, so you don’t need to add extra. This makes the recipe quicker and easier for both new and experienced bakers. It also helps the banana bread have a consistent texture.
How does self rising flour affect the texture of banana bread?
Self rising flour makes banana bread light, tender, and moist. The baking powder in it helps the bread rise and gives it a soft crumb. This creates a delicate, cake-like texture that goes well with the bananas.
What are the essential ingredients for banana nut bread made with self rising flour?
The key ingredients for banana nut bread with self rising flour are: – Self rising flour: It gives the bread structure and leavening. – Ripe bananas: They add moisture, sweetness, and banana flavor. – Chopped nuts (like walnuts or pecans): They add texture and nutty taste. – Granulated sugar: It sweetens the bread and balances the banana flavor. – Eggs: They bind the ingredients together and make the crumb tender. – Butter or oil: They add richness and moisture to the loaf.
What kitchen tools and equipment are needed to make banana nut bread with self rising flour?
To make banana nut bread with self rising flour, you’ll need: – Mixing bowls: For combining wet and dry ingredients. – Wooden spoon or electric mixer: To mix the batter well. – Loaf pan: A 9×5 inch loaf pan is best for baking. – Oven: A preheated oven at the right temperature is crucial for baking. – Optional equipment: A banana masher, food processor, or stand mixer can make prep easier.
How do you select and ripen bananas for the best banana nut bread?
Choose bananas that are ripe, with yellow skins and some brown speckles. Avoid green bananas as they’re not sweet or moist enough. If bananas aren’t ripe, you can speed up ripening by placing them in a paper bag or near other ripe fruit.
How do you properly mix and prepare the banana nut bread batter with self rising flour?
Mixing and preparing the banana nut bread batter with self rising flour is easy: 1. Mash ripe bananas until smooth. 2. In another bowl, whisk together self rising flour, sugar, and spices. 3. Add mashed bananas, eggs, melted butter or oil, and chopped nuts to the dry ingredients. 4. Gently fold the wet and dry ingredients together until just combined, being careful not to overmix. 5. Pour the batter into a greased loaf pan and bake.
What temperature should you bake banana nut bread made with self rising flour?
Bake banana nut bread at 350°F (175°C) for best results. Preheat your oven well before adding the batter. Bake for 55-65 minutes, or until a toothpick inserted into the center comes out clean. Watch the bread closely towards the end of baking time, as ovens can vary. The bread is done when it’s golden brown on top and a skewer inserted into the center comes out clean.
How should you store and preserve banana nut bread made with self rising flour?
To store and preserve your homemade banana nut bread: – Room temperature storage: Cool the bread completely, then store it in an airtight container at room temperature for up to 4 days. – Refrigeration: Store the bread in the refrigerator for up to 1 week for longer storage. – Freezing: Wrap the loaf tightly in plastic wrap or foil and freeze for up to 3 months. Thaw at room temperature before serving. No matter how you store it, banana nut bread is best enjoyed fresh. These methods will help keep its moisture and flavor for as long as possible.
4 Comments
Pingback: Easy Banana Nut Bread Recipe with Pecans | Classic Loaf 2024
Pingback: Delicious Banana Chocolate Chip Cookies Recipe 2024
Pingback: How to Make the Perfect Betty Crocker Banana Nut Bread
Pingback: The Ultimate High-Protein Banana Bread for Fitness Lovers 2025